One to Many
In this lesson, we’ll explore how to set up and work with a one-to-many relation in Remult, where one Customer can have many Order records.
Defining the Relation
We begin by setting the relation in the shared/Customer.ts file. This one-to-many relation will allow a customer to be linked to multiple orders.
3 collapsed lines
import { Entity, Fields, Relations } from 'remult'import { Order } from './Order'
@Entity('customers')export class Customer { @Fields.integer() id = 0 @Fields.string() name = '' @Fields.string() city = '' @Relations.toMany<Customer, Order>(() => Order) // This establishes the relation orders?: Order[]}This creates a one-to-many relation where each Customer can have multiple Order records. The orders field is now an array of Order objects.
Fetching Related Data
Just like with many-to-one relations, you can use the include option in the find method to fetch related Order data for each Customer. This ensures that the associated orders are included in your query results.
const customers = await repo(Customer).find({ include: { orders: true, },})This query fetches customers and includes their related orders.
You can experiment by toggling the include value between true and false to observe how the results change.
Inserting Child Entities (Orders) into a Parent (Customer)
You can also insert related Order items directly into a Customer repository. For example, in the shared/SeedData.ts file, you can insert customer records and their corresponding orders as shown below:
import { repo } from 'remult'import { Customer } from './Customer'
export async function seedData() {  const cRepo = repo(Customer)  const [c1, c2, c3] = await cRepo.insert([    { id: 1, name: 'Fay, Ebert and Sporer', city: 'London' },    { id: 2, name: 'Abshire Inc', city: 'New York' },    { id: 3, name: 'Larkin - Fadel', city: 'London' },  ])
  await cRepo.relations(c1).orders.insert([    { id: 1, amount: 10 },    { id: 2, amount: 15 },  ])
  await cRepo.relations(c2).orders.insert([    { id: 3, amount: 40 },    { id: 4, amount: 5 },    { id: 5, amount: 7 },  ])
  await cRepo.relations(c3).orders.insert([    { id: 6, customer: c3, amount: 90 },    { id: 7, customer: c3, amount: 3 },  ])}
Here’s what’s happening:
- First, we create three customer records using
cRepo.insert(). - Then, we use
cRepo.relations(c1).orders.insert()to insert orders related toCustomer 1. - Similarly, we insert related orders for
Customer 2andCustomer 3.
By using the relations method provided by the repository, you can easily manage the insertion of related child entities (in this case, orders) directly into their parent (customer).
Repository Methods for Relations
Most repository methods, such as find, insert, update, updateMany, delete, and deleteMany, can be used in this way through the relations method. This allows you to perform various operations on related entities within the context of their parent entity.
For example, you can retrieve all orders related to a customer:
const ordersForCustomer = await cRepo.relations(customer).orders.find()This flexibility makes it easy to manage related data within Remult, simplifying many common data manipulation tasks.
In this lesson, we’ve learned how to define a one-to-many relation between Customer and Order, and how to query and insert related data using Remult. These techniques give you the power to effectively model and work with complex data relationships in your applications.
Here’s a polished version of the text:
Relations in Remult Admin
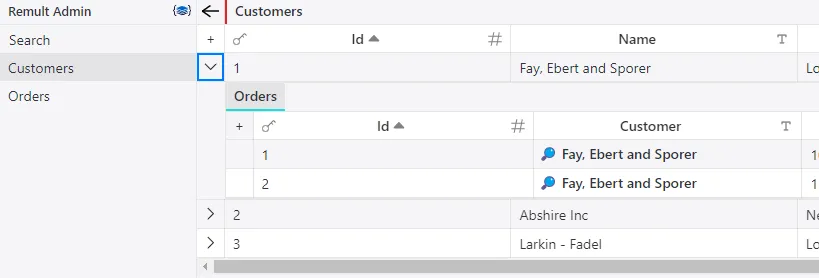
In the Remult Admin UI, one-to-many relations are displayed directly within the table view. For example, you can see all the orders associated with a customer right from the Customer table view.

To explore how this works, click the “Remult Admin UI” link at the bottom left of the interface.
- Installing dependencies
- Starting http server